Mastering Asphalt Shingle Installation: A Comprehensive Guide for Homeowners
Asphalt shingles are a widely preferred roofing option due to their cost-effectiveness, durability,…….

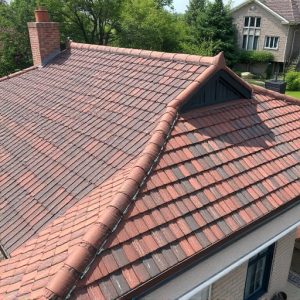
Asphalt shingles are a widely preferred roofing option due to their cost-effectiveness, durability, and versatile styles, suitable for both residential and select commercial buildings. They offer robustness, fire resistance, and waterproofing with a mineral granule layer that protects against UV rays and adds aesthetic appeal in various colors and textures. These shingles can last up to 30 years and are lightweight, adaptable to different roof types, and easy to install, repair, or replace. They also feature reflective granules that can improve energy efficiency, potentially reducing cooling costs. Asphalt shingles come in three-tab or architectural variations, allowing for customization to match diverse architectural designs. For successful installation, it's crucial to start with starter shingles at the eaves for a sleek appearance and effective wind defense, followed by precise alignment of the main field shingles from bottom to top, ensuring a watertight seal and structural integrity that can withstand environmental stressors. This foundation is critical for the long-term performance and weather resistance of the roofing system.
When it comes to safeguarding your home, the integrity of its roof is paramount. Asphalt shingles stand out as a durable and economical roofing solution, offering a blend of functionality and aesthetic appeal. This comprehensive guide delves into the step-by-step process for asphalt shingle installation, ensuring your roof serves its purpose effectively. From comprehending the material composition and advantages of asphalt shingles to understanding pre-installation considerations, we cover it all. We’ll walk you through each stage, including inspecting the existing structure, laying out deck protection, installing starter shingles, aligning individual shingles, cutting around protrusions, and securing flashing with caulking and sealing for a weather-tight finish. Additionally, we’ll help you select the perfect type and color of asphalt shingles to complement your home’s design. Maintenance strategies and longevity tips will ensure your asphalt shingle roof remains in top condition. For those unsure about tackling this project alone, we’ll outline when professional contractor assistance is essential for a flawless asphalt shingle installation. Discover the art of asphalt shingles with our detailed guide on roofing excellence.
- Understanding Asphalt Shingles: Material Composition and Benefits
- Pre-Installation Considerations for Asphalt Shingle Roofing
- Step-by-Step Guide to Installing Asphalt Shingle Roofs
- – Inspecting the Existing Structure
- – Laying Out the Roof Deck Protection
- – Applying Starter Shingles
Understanding Asphalt Shingles: Material Composition and Benefits

Asphalt shingles represent a widely used and cost-effective roofing solution for residential and certain commercial properties. These shingles are composed of a fiberglass or organic base mat, which is saturated with asphalt and coated with mineral granules. The fiberglass mat contributes to the strength and fire resistance of the shingle, while the asphalt provides durability and waterproofing capabilities. The granules serve a dual purpose: they shield the asphalt from harmful ultraviolet rays, and they enhance the aesthetic appeal with a variety of colors and textures.
When selecting asphalt shingles for roofing, one must consider their specific needs and preferences in terms of longevity, style, and budget. High-quality asphalt shingles can last between 20 to 30 years, offering a balance between affordability and durability. They are also relatively lightweight, making them suitable for a variety of roof structures. The benefits of asphalt shingles extend beyond their initial cost; they are easy to install, repair, and replace, which is advantageous for both new construction and re-roofing projects. Additionally, the mineral granules found in these shingles play an important role in reflecting sunlight, which can contribute to energy efficiency and potentially reduce cooling costs for homeowners. Roofing with asphalt shingles offers a range of styles, from three-tab designs to laminated architectural shingles that provide a more upscale appearance. This makes them a versatile choice for both new construction and replacement roofing projects, capable of complementing a wide array of architectural styles.
Pre-Installation Considerations for Asphalt Shingle Roofing

When undertaking the installation of asphalt shingle roofing, pre-installation considerations are paramount to ensure a durable, weather-resistant, and long-lasting finish. Proper planning and preparation can mitigate potential issues during the actual roofing process and contribute to the overall quality of the final product. Begin by thoroughly inspecting the existing roof structure for signs of damage or decay that could compromise the integrity of the new installation. Ensure that the substrate is sound, with no soft spots or rot, which might be indicative of underlying moisture issues. Assess the pitch and condition of the roof to determine if any additional structural support or waterproofing measures are necessary.
In addition to evaluating the current roof conditions, it’s crucial to consider local building codes and regulations that govern asphalt shingle installation. These codes can dictate everything from fastening patterns and nail placement to the types of underlayments and flashing materials required. Consult with a professional roofer or your local building department to ensure full compliance and avoid costly and time-consuming post-installation corrections. Furthermore, take into account the specific environmental factors such as high winds, heavy snow loads, or frequent rainfall that the roof will need to withstand. Selecting the appropriate grade of asphalt shingle based on these conditions will enhance the longevity and performance of your roofing system. Lastly, consider the aesthetic aspects of your project, including the color, texture, and profile of the shingles, to complement your home’s design while also fitting into the neighborhood’s visual character. Proper preparation in these pre-installation stages will set the foundation for a successful asphalt shingle roofing project.
Step-by-Step Guide to Installing Asphalt Shingle Roofs

– Inspecting the Existing Structure

When addressing the installation or replacement of asphalt shingles, a thorough inspection of the existing roof structure is paramount for successful outcomes in roofing. This initial step ensures that any structural issues are identified and addressed before new shingles are applied. Homeowners or professionals conducting this evaluation should look for signs of wear, such as cracked, curled, or missing shingles, as well as assess the condition of the underlayment and decking. Any damaged components must be repaired or replaced to provide a solid foundation for the new roofing material. Additionally, checking for proper ventilation in the attic space is crucial, as adequate ventilation prolongs the lifespan of the shingles by regulating temperature and moisture levels. This process not only facilitates a more durable and weather-resistant installation but also contributes to the overall longevity and performance of the roofing system.
Following the initial assessment, the next stage involves preparing the surface for the new asphalt shingles. This preparation phase includes cleaning the existing roof thoroughly, ensuring that no debris or algae remains that could compromise adhesion. Any necessary repairs to the decking, underlayment, and flashing should be completed at this juncture. Properly aligning and securing drip edges along the eaves and rakes helps channel water away from the fascia board and prevents back-runoff onto the roof. These preparatory steps are integral to ensuring a uniform and durable finish for the new asphalt shingles, setting the stage for successful roofing installation.
– Laying Out the Roof Deck Protection

When initiating the process of installing asphalt shingles, the foundational step involves laying out the roof deck protection, a critical component for safeguarding your home against weather elements and moisture intrusion. This protective barrier serves as a shield between the shingles and the wooden roof deck, ensuring structural integrity and longevity of the roofing system. The installation begins with carefully measuring and marking the roof’s outline on the deck to establish the layout precisely. Once the initial measurements are set, contractors secure the starter course shingles along the roof’s lower edge. This starter row acts as a beginning point and helps to direct water flow towards the gutters.
Subsequently, the installation continues with laying out full-sized asphalt shingles in courses or rows, starting from the bottom edge of the roof and moving upward. Each shingle is carefully aligned with the one below it, creating a watertight seal. The roof deck protection must be uniformly covered without leaving gaps or overlaps; this is crucial for preventing leaks. As each course is laid, roofing nails are driven through the shingle tabs and into the deck protection beneath, ensuring a secure hold that can withstand environmental pressures. This meticulous process of laying out the roof deck protection and installing the shingles forms the base for a robust and durable asphalt shingle roof, which will protect your home for years to come.
– Applying Starter Shingles

When embarking on a roofing project that involves asphalt shingles, the initial step is to apply starter shingles along the eaves. These specialized shingles are designed with a low-profile appearance and serve as a wind-deflection measure to protect the edges of your roof. Begin by aligning the starter shingles evenly across the bottom edge of the roof, ensuring that each shingle overlaps the one below it. Use roofing cement or nails to secure them in place, adhering to the manufacturer’s guidelines for proper installation. It’s crucial to maintain a uniform pattern and overlap as you progress along the eaves to prevent water intrusion and ensure the integrity of the roofing system. After securing the starter shingles, you can proceed with laying the main field shingles, starting from the bottom edge and working your way upwards, overlapping each subsequent course slightly more than the one below it to allow for expansion and contraction due to temperature changes. This careful initial application of starter shingles is a foundational step in asphalt shingle roofing, setting the stage for a durable and weather-resistant finish. Proper installation at this phase can significantly contribute to the longevity and performance of your new roof.
when tackling a roofing project involving asphalt shingles, understanding their composition and benefits is crucial. This article has provided a comprehensive overview of pre-installation considerations and a detailed step-by-step guide for installing these shingles on your roof. From inspecting the existing structure to laying out the deck protection and applying starter shingles, each step is pivotal in ensuring a durable and weatherproof finish. By following this process, homeowners can rest assured that their investment in asphalt shingle roofing will yield long-lasting results with enhanced protection against the elements. With careful planning and adherence to proper installation techniques, your roofing project is poised for success.